Thunderbird is a free email application that’s easy to set up and customize – and it’s loaded with great features! And switching from Outlook, Apple Mail or Eudora is easy.
Below are the basic settings you need to send and receive emails. To manually configure an account in Thunderbird, you need the following details:
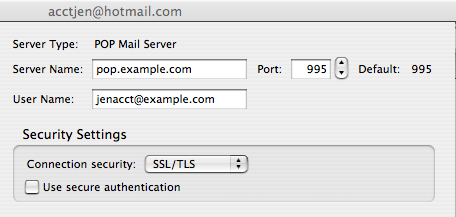
- incoming mail server and port (for example, “pop.example.com” and port 110 or “imap.example.com” and port 143). The incoming mail server settings can be found inside of your hosting control panel under the email account settings. Ignore the outgoing server settings. To prevent spammers from hacking your password and sending spam we do not allow direct SMTP connections to the incoming mail server.
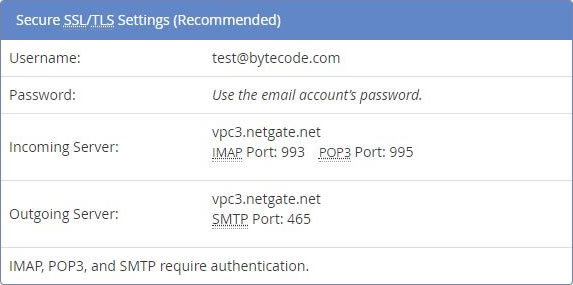
- outgoing mail server and port (for example, “smtp.example.com” and port 25). If you subscribe to our SMTP service your outbound settings were sent to in a welcome email.
- security setting for the connection with the server (for example, “STARTTLS” or “SSL/TLS”). Using encryption is recommended but non-encrypted connections are also supported.
First, open the Account Settings: In the Thunderbird menu bar, click the Tools menu and select Account Settings, or click the Application menu button ![]() and select Options and Account Settings from the sub-menu. Each email account that has already been configured is listed on the left side of the Account Settings dialog. These accounts correspond to the top-level folders displayed in the “All Folders” list.
and select Options and Account Settings from the sub-menu. Each email account that has already been configured is listed on the left side of the Account Settings dialog. These accounts correspond to the top-level folders displayed in the “All Folders” list.
At the bottom of the left pane, click the Account Actions button and select Add Mail Account….
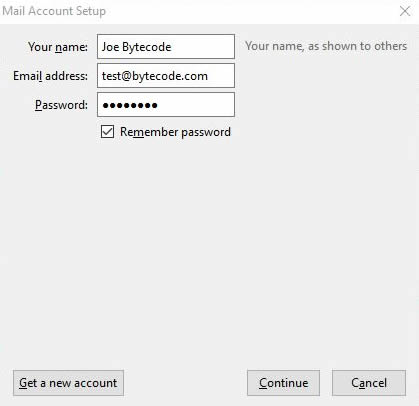
Enter your email account details and press Continue. Thunderbird will try to determine your account settings based on the domain portion of your email address (that is, the portion after the “@” symbol).
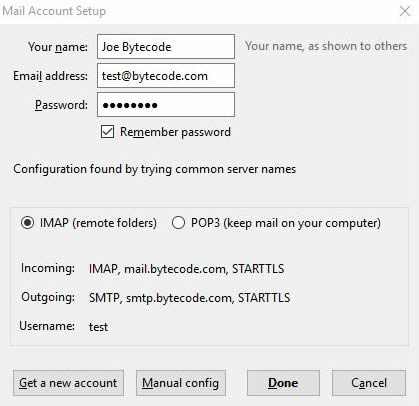
Press Manual Configuration and edit the server names, ports and IMAP/POP to manually set up the the account.
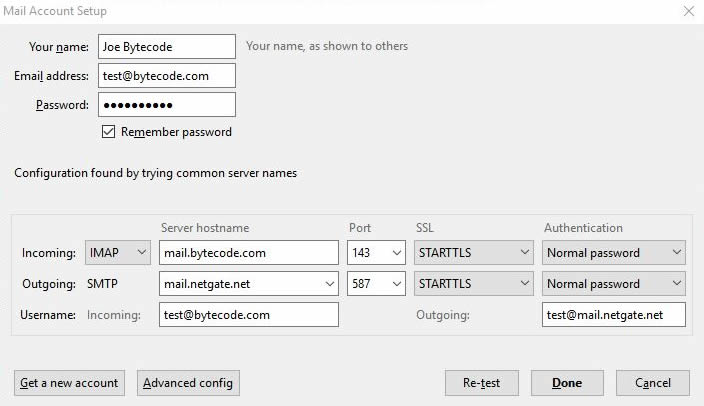
Click Re-test to test your manual settings; there should be a quick response indicating the settings are valid. If not, press the Stop button to abort the lookup, then edit the server names, ports and IMAP/POP and click Re-test again. After the pressing Done button the account should be setup and you should be able to send and receive emails.
Manually configure the outgoing server
If you created the SMTP account in the previous step you can skip this section.
Multiple email accounts can use the same outgoing SMTP server. Therefore, SMTP accounts can be created separately from email accounts. To create a new SMTP account in the Account Settings dialog, in the left pane, select Outgoing Server (SMTP) from the bottom of the list. There may be an entry in the resulting list that was created when you entered your account details. Either edit that entry or add a new entry.
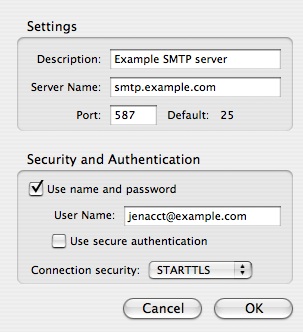
As another example, a NetGate SMTP account is configured as follows:
- Server Name: mail.netgate.net
- Port: 587
- Use name and Password: checked
- User Name: Your NetGate SMTP user name.
- Connection Security: STARTTLS
After saving the information about the new outgoing server, select your new email account from the list. In the Outgoing Server (SMTP) field, select the SMTP server from the drop-down list. Other items on the page were automatically created when you entered the account details – alter and extend as necessary.
Click on the Server Settings option under your new account. Make sure the entries in the following fields are correct:
After saving these changes you should be able to send and receive emails. Other aspects of account configuration are optional.